Submit a Ticket
Please read the questions and answers below before completing this form. You may already find the solution to your question and/or problem below.
If you have not found a solution, do not forget to describe your problem very clearly. With a clear description you will often be helped very quickly. Descriptions such as: "It doesn't work" are vague descriptions that often require a longer time to analyze your problem.
Our technical engineers try to provide the best support with fast response times. If you have not received a response by email within 24 hours, please check your spam, our email with answer and solution may have ended up there.

Online Designer
Preferably use a PC, but you can also design with a tablet if it has a mouse.
- Acrobat Reader, which you can download and install for free from the Acrobat website. The PDFs it creates were tested with Acrobat. You can also use other PDF readers, but we don't support them! Printer drivers also work best with Acrobat Reader!
- The Google Chrome browser is the best browser for this. The online designer has been tested with this browser; we do not support other browsers.
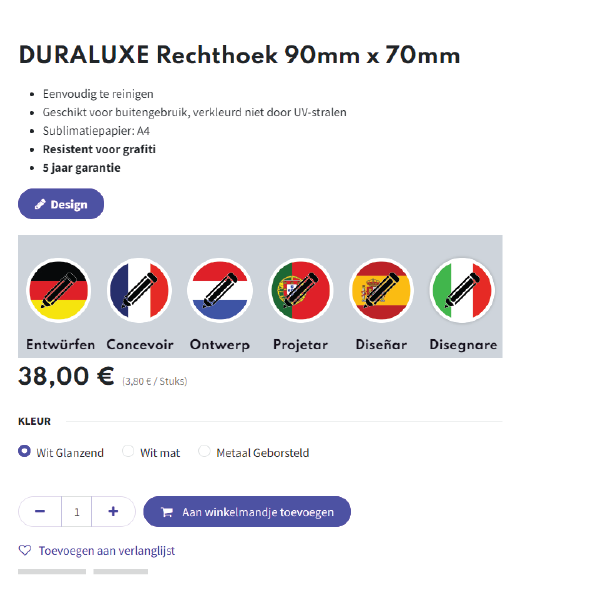
- Go to the shop page and select your product
- Click the "Design" button if you want to design in English; for other languages, click the flag of your language.
- The design tool will open in a new tab with the format you chose.
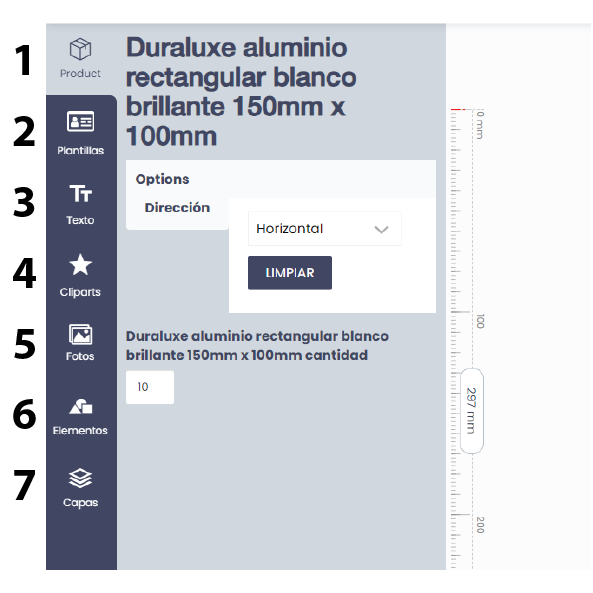
- If the option for this size exists that you can design Horizontally and Vertically, you must first select your preferred option.
- You can start designing now!
- Not every feature is available for every product, and if it's not available, it won't appear in the left toolbar!
- Product: This feature appears if you can design horizontally and vertically, for example. You must first make a selection before continuing to design.
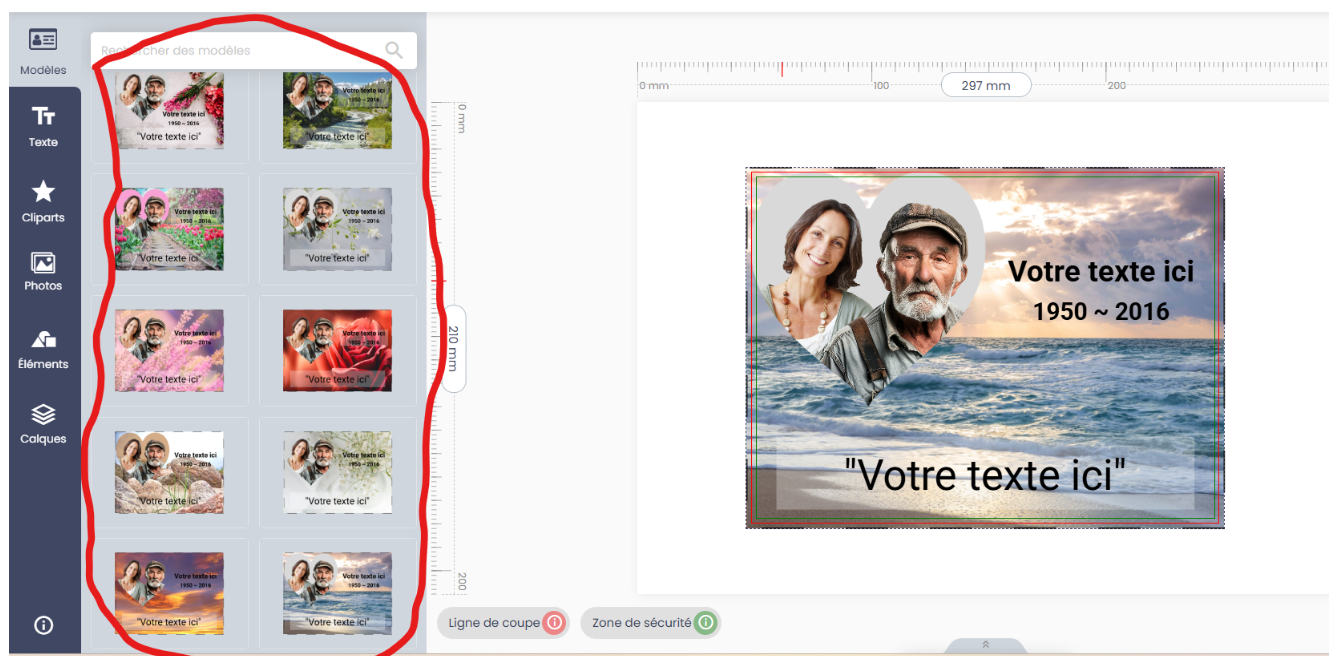
- Templates: For some products, we've included templates you can use. Select a template and you can start designing right away. This is a great way to save time.
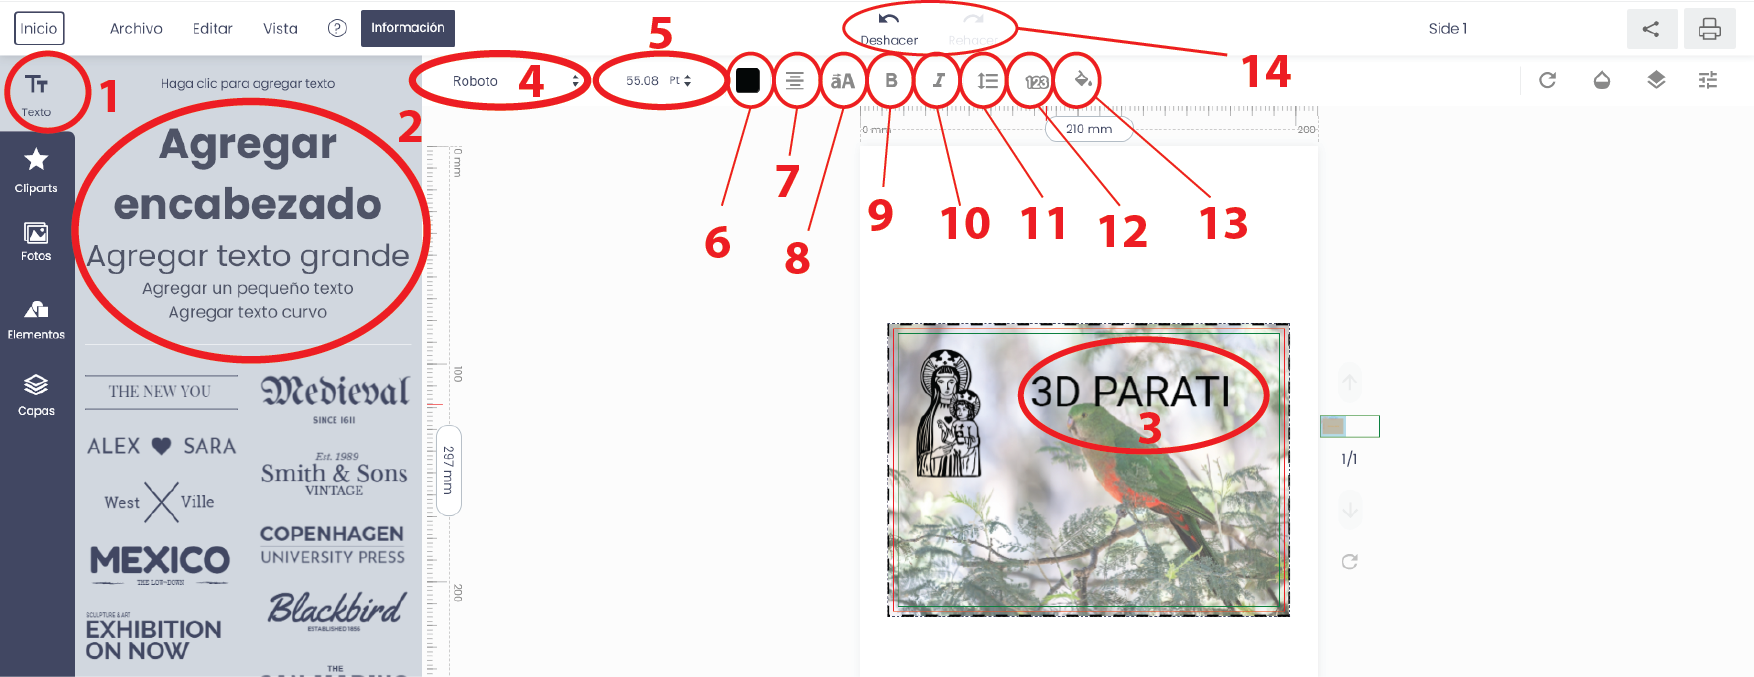
- Text: This is the text function. Select a text type and it will appear on the design. You can then edit the text to your liking.
- Cliparts: This feature includes a library of figures, icons, flags, etc. specifically for our specific clients.
- Photos: In this menu, you can upload photos from your PC or other channels. This feature includes over 1 million high-quality photos perfect for use as wallpaper.
- Elements: This function is used to create shapes or a barcode/QR code. For example, by selecting the "rectangle" shape, a rectangle will appear in the design. You can then color-code this rectangle, stretch it across the entire design, and thus create a colored background.
- Layers: Here you can rearrange various elements such as text, photos, figures, etc., to change their order (up or down). You can also hide or delete a layer.
- From the top menu bar, select: FILE
- Select: Export file
- It is best to create a separate folder with any subfolders for your designs, so you don't have to search for them later.
- Give the file a name and save it.
- First open the format you need
- In the top menu bar, go to: FILE
- Select: Import file
- In your file explorer, go to the folder where your file is saved and select your file.
- Your file is now loading.
- From the top menu bar, select: File
- Select: Download
- Select: PDF
- Now please wait a moment so that the software can convert your design into PDF.
If you're using a Mac or iPod, or have images stored on one of these devices, they might not display. Click "Information" in the top menu bar, and a pop-up window will open.
In this pop-up you will find a link to an online tool (befunky) where you can upload your photo and then save it as a png.
Use this png!
Another possibility is that your image is too large (more than 8MB). First, reduce the size of the image using, for example, "Paint" for Windows or another photo editing program.
Click on "Information" in the top menu bar, a popup will appear.
In this pop-up you will find some links to online programs where you can upload your photo and then remove the background.
Please note, we offer these links only as additional help; they are not our programs, and we do not offer support for them!
Not all features are available for every font!
Select your text to apply the functions.
- Function key to add text
- Select the type of text you want and a text will appear on your design that you can edit with the editor.
- Select the text to edit
- Select the script/font (not every script is suitable for all languages)
- Choose the text height
- Choose the text color
- Align text
- Change from lowercase to uppercase or vice versa
- Bold text
- Text in italics
- Line height and letter spacing
- Text outline, determine the color and width of the text outline
- Text background color
- Undo, undo your last edit
Acceptable file formats: JPG, JPEG, and PNG. We prefer PNG.
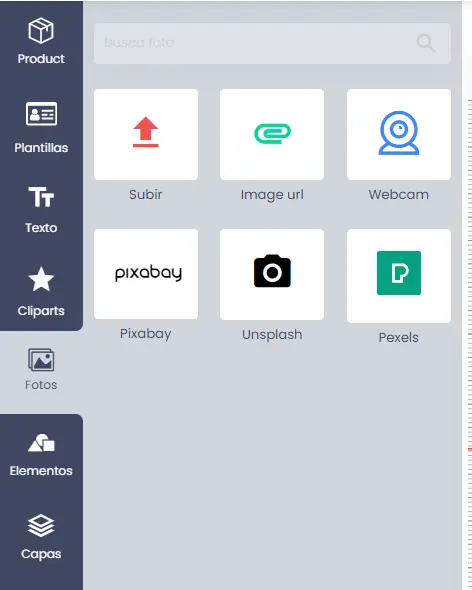
You have the following options with the "Photos" function:
- Upload photo from your computer
- Enter the URL of an image online and add it to your design. Note: Many images online are protected; it's your responsibility to check whether an image is protected or not!
- Take a photo with your webcam and add it to your design
- Choose photos online. Over 1 million high-quality photos with Pixabay, Unsplash, Pixels, and more for your background or design.
First, load a photo into your design or select a photo in the design, this will make the features available
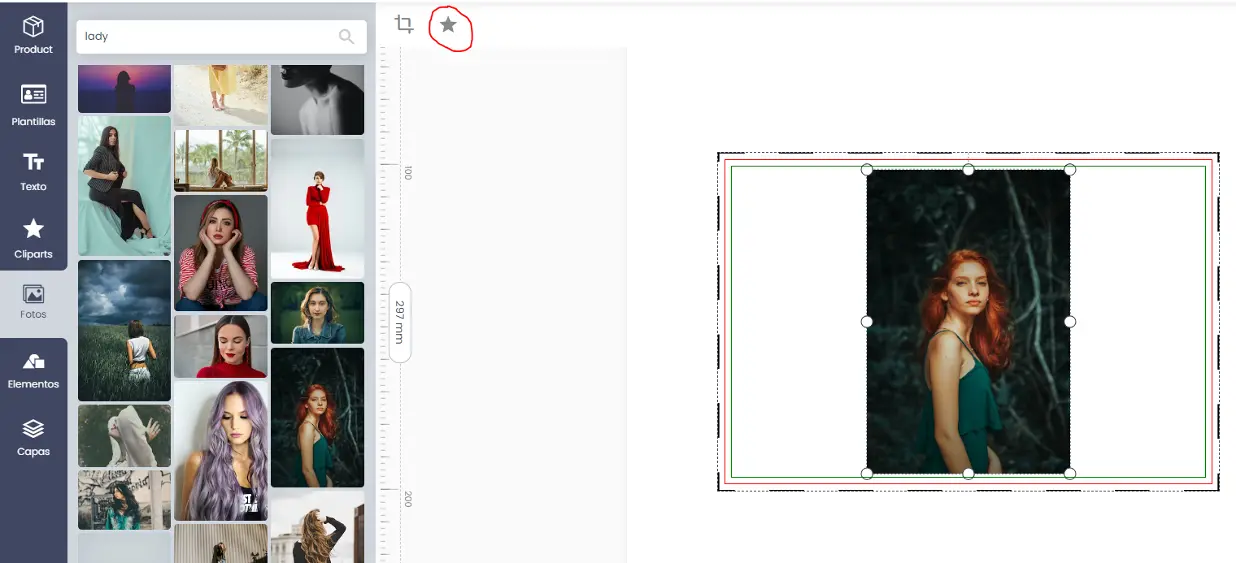
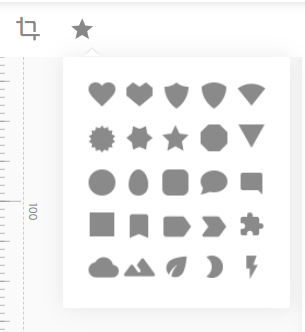
Click the "star" to select a picture. Clicking the icon to the left of the star allows you to crop the photo.
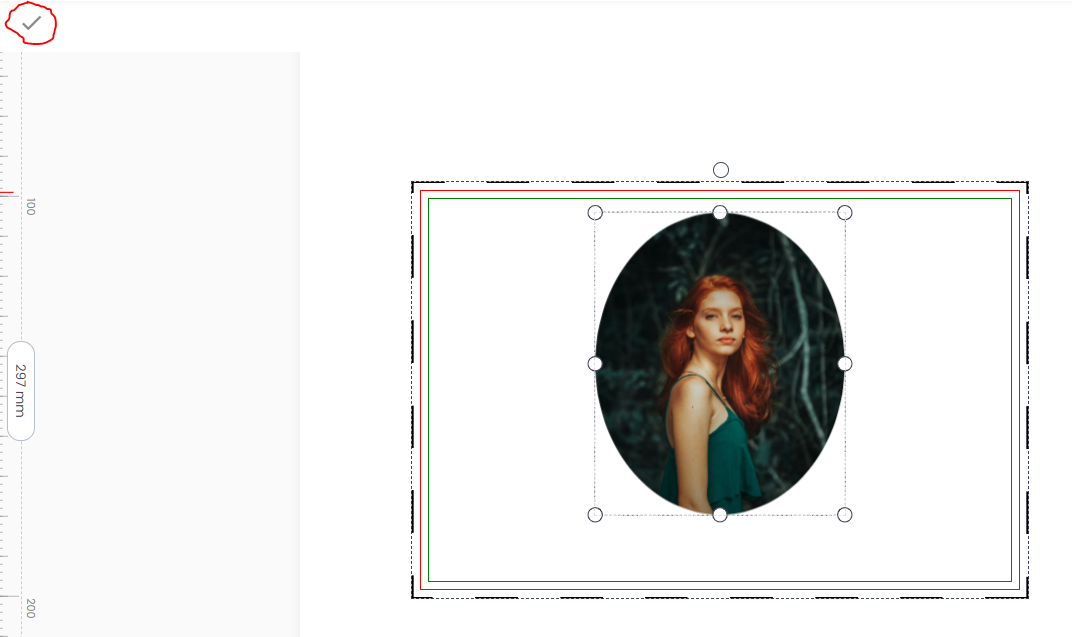
Select your shape! Note: You can still distort the shape later. For example, if you're using a circle, you can stretch it to an oval.
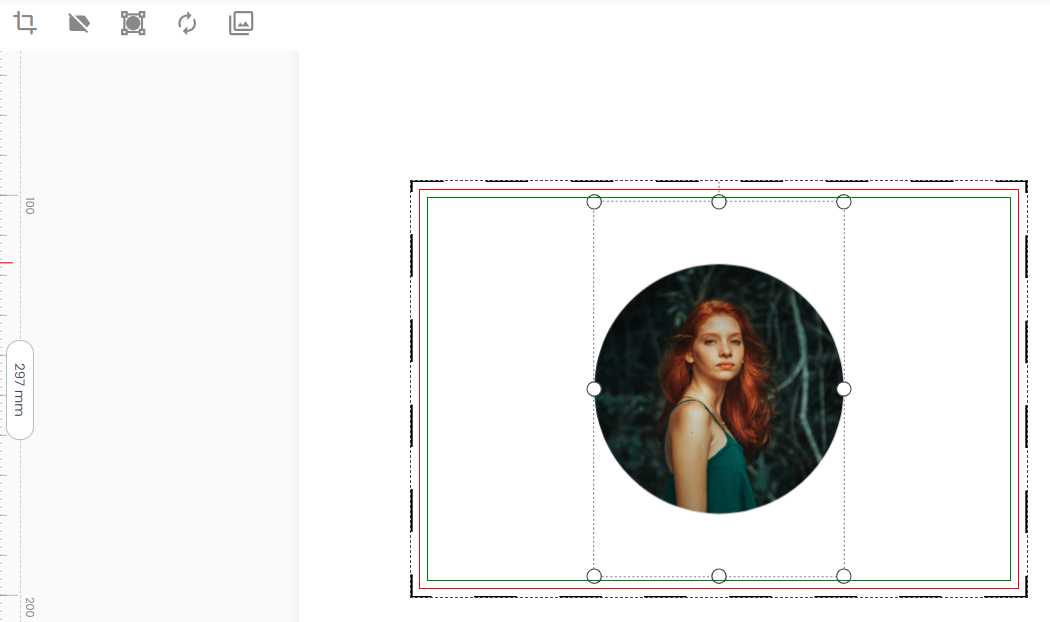
The photo is automatically placed in a circle. The circle's diameter is equal to the smallest side of your image. You can now move and position the photo.
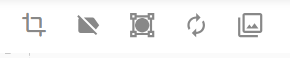
The following functions are available (from left to right):
- Crop: Selecting this will open a window where you can crop the photo.
- Delete Figure: This removes the figure and also the image; this cannot be undone!
- Edit figure: Stretch or distort the figure and then click the checkmark to confirm. (See photo with example oval)
- Replace Image: This function is important if you have saved a design and later want to change the photo.
- Detach the image from the figure. Be careful, you can't reattach it!
REMARK:
If you select the photo you can enlarge it so that you can fit a part nicely into the figure.
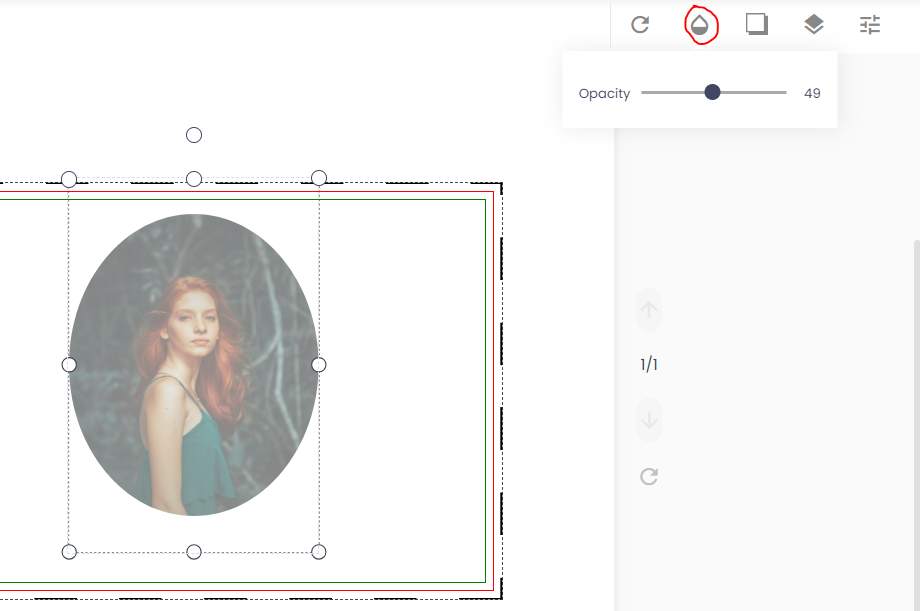
The "Blur" function allows me to blur a photo and make it more transparent.
This often allows the overlying text to be made more visible.
Slide left or right to blur more or less.
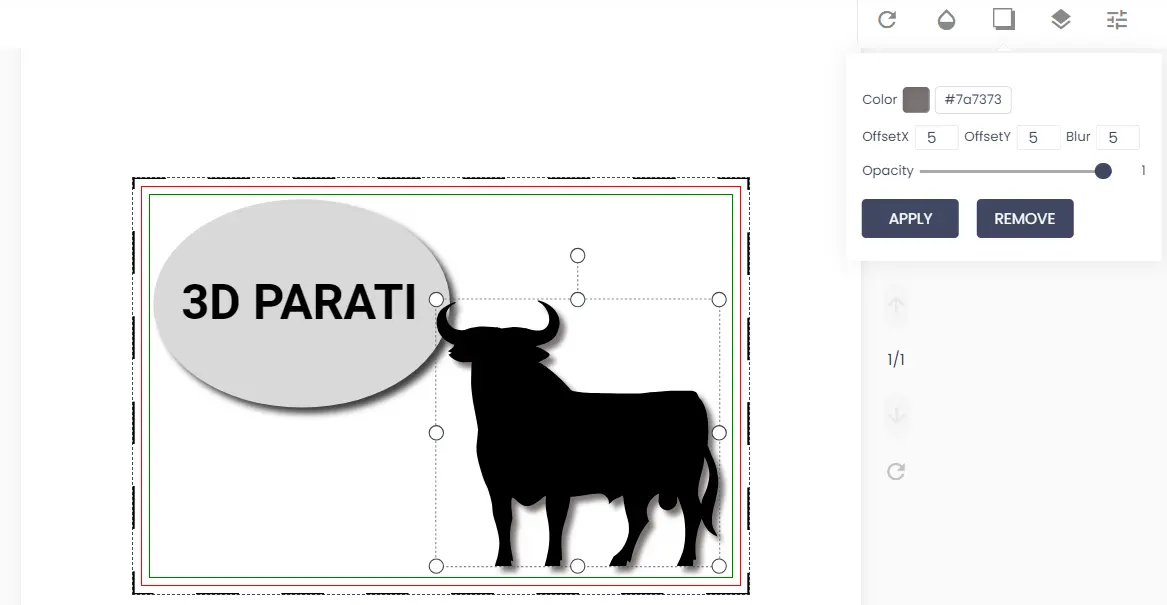
When you select a figure or clip art, the option to create a shadow appears.
You can set the following:
- The color of the shadow
- Set the distance of the shadow for x and y
- Blur or brighten the shadow
- Make the shadow transparent
- Confirm or remove the changes
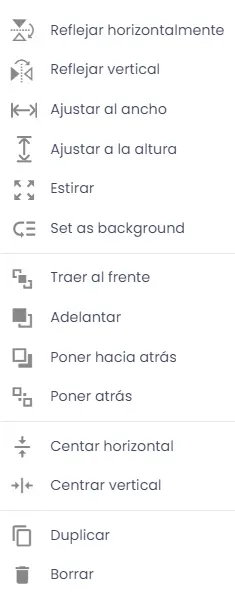
Depending on whether you select an object, text, or photo, you'll see more or fewer options when you right-click.
There are the following options (see photo below from top to bottom):
- Flip horizontally
- Vertical mirroring
- Expand to the width of the design area
- Enlarge to the height of the design plane
- Stretch to the entire design area (useful for backgrounds)
- Set as wallpaper
- Place on top (top layer)
- Place to top (1 layer up)
- Place to the back (1 layer down)
- Place at the back (bottom layer)
- Center horizontally
- Center vertically
- Multiply (make copy)
- Remove
If the design tool cannot load the page, try designing the product in another language first.
Possible causes include:
- There are works in progress on the design page in question
- It's possible that a design isn't yet available in your language. Contact us, and we'll do what's necessary to provide the design tool for your language and product as well.
- Your internet connection is very weak, it takes too long to load
If the design tool does open in another language, try again in your own language the next day.
If this does not work the next day, please fill out the form below.
We also provide .eps and .svg files, which you can find in your product's "Documents" section. You can edit an .svg file with Inkscape, a free design tool you can install on your computer. If a downloadable file isn't available, please fill out the form below.
If the design tool doesn't load the previously created design correctly and the dimensions don't match, check the following:
- Did you choose the same size? If not, choose the correct size for your design.
- Are you working in Google Chrome? Your design might not display correctly because you're using a different browser. It's best to clear your history first and open your design in Google Chrome.
NOTE: If your design was created in a browser other than Google Chrome, you may not be able to load it correctly.
You can always select everything and then adjust the size together.
This is a common problem with sublimation, but it always has a cause: your operating system, photo editing program, calibration screen, etc. Thanks to our years of expertise, we can help!
Below are some possible solutions:
If you use photos with a filter (for example, photos edited in Photoshop), the photo may not print correctly.
For example: you use a "green" filter, the result will give a green cast.
Solution: Avoid filters in your images!
Tips:
Check your settings in Acrobat Reader. They should be set (in the "advanced" window) as: "let the printer determine the colors."
In Acrobat, you can also select the paper type (rigid or textile). Our experience shows that colors are better with textile than with rigid, depending on your operating system version. This may also change after updating your computer! Test both profiles if you encounter a problem!
If a previously created image no longer prints properly, check the following:
- Print a test page to check if each color still prints correctly
- Check your settings in Acrobat (see below in the "printer driver" menu)
- Are you using 3D PARATI sublimation paper? (Each paper has different properties. Our paper has special molecules that absorb your ink better, and our paper also dries faster. So don't use any other brand!)
- Are your colors on the light side, not quite fully colored? Increase the pressing time, especially for darker colors.
To get a nice result you need to take a photo that:
- A plain background has
- where the background has been removed
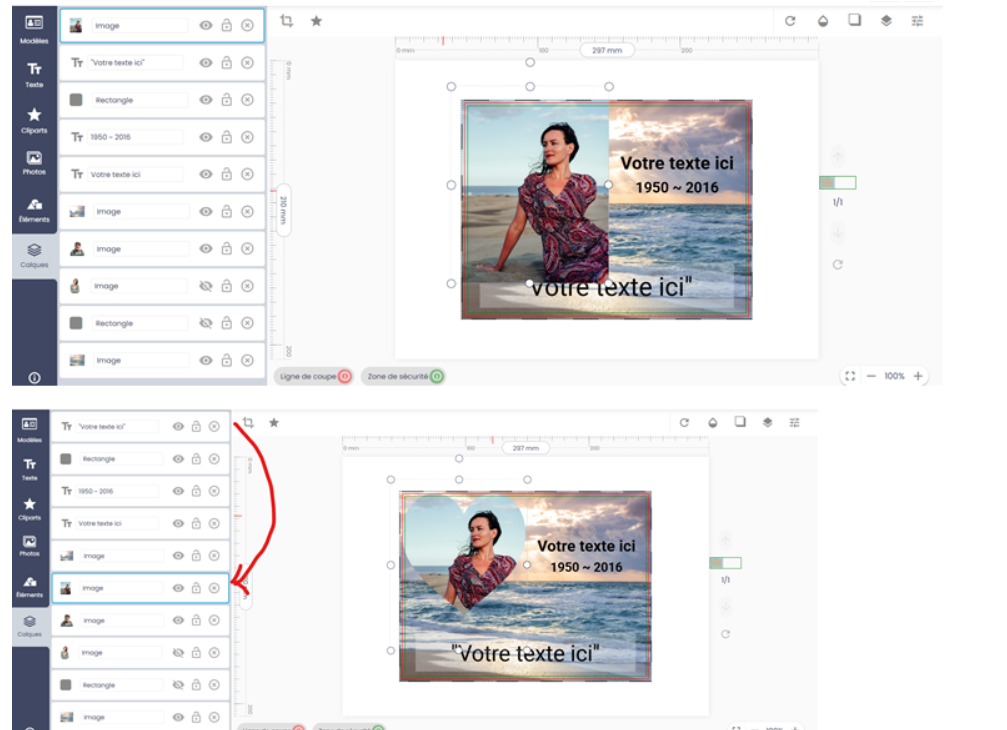
Select the design:
The examples you can load have cropped photos; in the examples below, we're loading a photo with a plain background.
Follow the next steps:
- Load your desired photo (in the left menu select "Photo" and load your photo)
- In the left menu, go to "Layers" (bottom icon)
- In the 2nd column you see all the layers, the top one is also the top layer.
- Clicking on the "eye" in a layer makes that layer invisible.
- Do this with the layers where there is already a photo of people as an example
- Our examples also include a gray area that serves as the background. You can change its color or even make it invisible.
- Position your photo over the cut out shape (for example the heart)
- By making the photo a little transparent you can clearly see how to position the photo.
- Now move the layer with your photo to the layer just above the one with the photos of the people in our example (see image 2)
- Your photo is now ready.
Tips:
By clicking on a layer in the second column, you also select that layer and can make adjustments to its size, location, etc. if necessary.
Acrobat currently only supports Windows 10 or later. If you have an older version, download Acrobat via the following link:
https://get.adobe.com/reader/otherversions/
Printer Driver
Go to the Epson website (copy the link below) and download the printer driver.
https://www.epson.ie/en_IE/support/sc/epson-surecolor-sc-f100/s/s1857
Run the .exe file as administrator (left-click on the file and select: "Run as administrator")
Printer driver file name: epson637078eu.exe
Follow the instructions on the installation screen.
When you click print in Acrobat Reader, the following window appears, first select your printer at the top.
Then set the driver as shown in the image below.
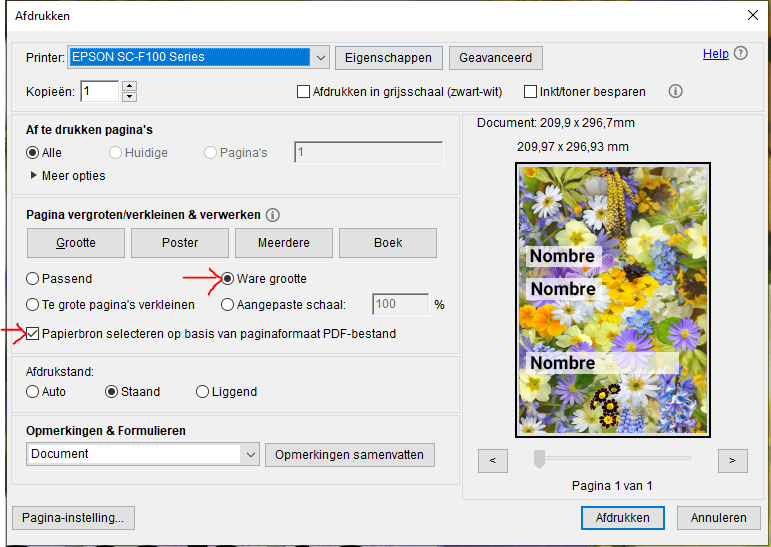
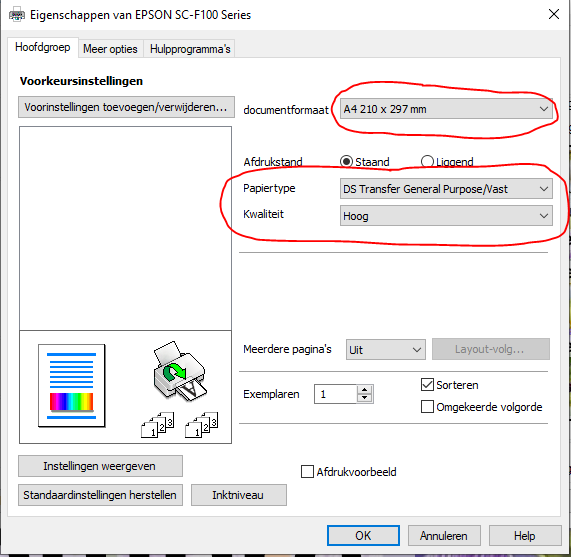
Click on "Properties" next to the printer selection, a second window will appear
Select your design paper size here
Set the quality to: "High"
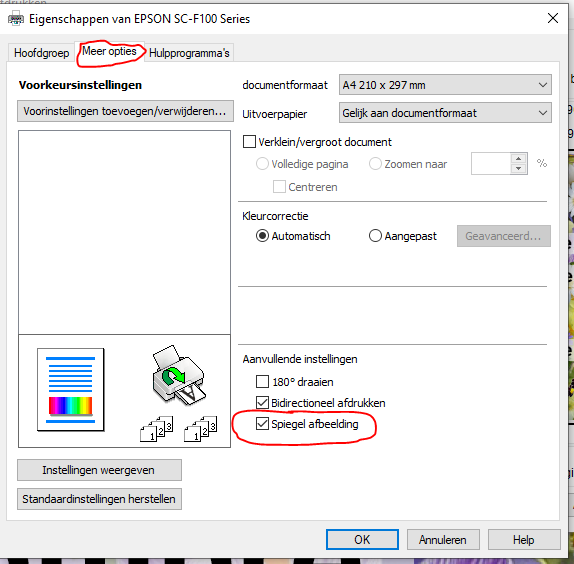
Click on "More options" at the top (2nd tab)
Check that "Mirror image" is set correctly.
The general rule is that mirroring should be turned on for all non-transparent objects such as the Duraluxe plates.
For products such as glass, plexiglass, etc. where you will be sublimating on the back, "Mirror" must be turned off.
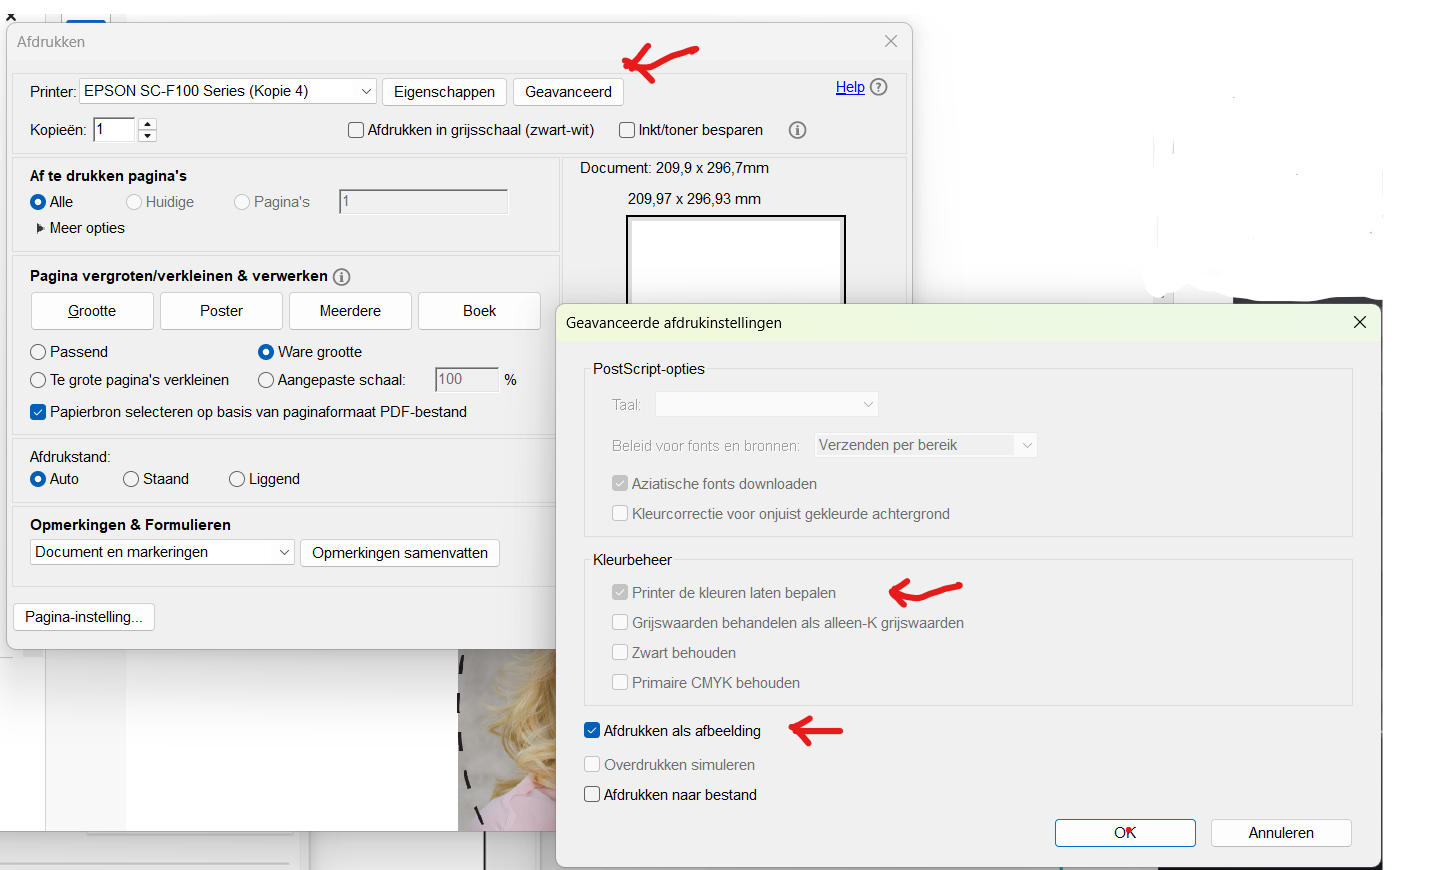
Check the following settings in Acrobat: select "ADVANCED", a second tab will open.
Select:
- Let the printer determine the colors
- Print as image
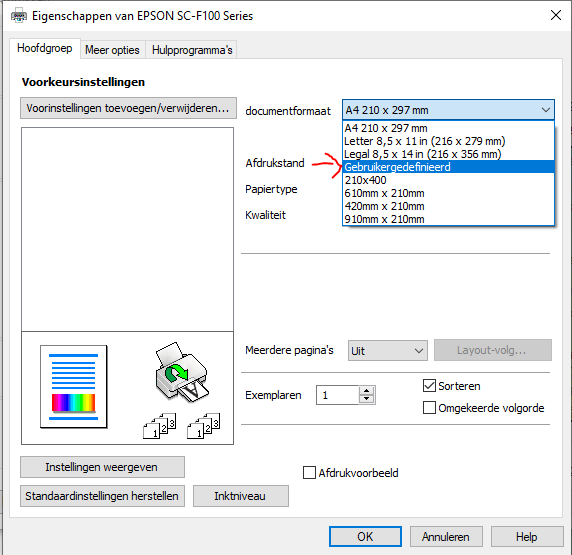
When you click print, the printer driver will open, select your Epson printer and then click properties.
Then click in the document format bar and select "User Defined", a 2nd window will open.
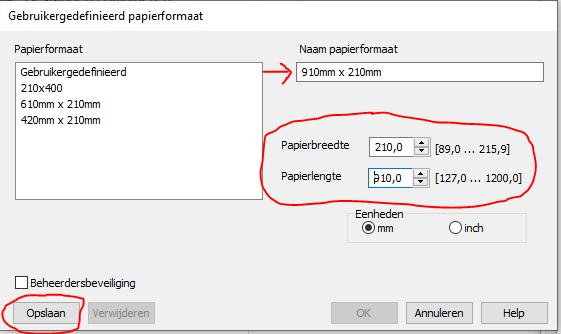
Enter the size of the paper format in "Paper format name"
Then enter the width and length in mm.
Click "Save." Your paper has now been added. Close all windows by clicking "OK."
EPSON SC-F100
Print at a higher quality; you can set this in the printer driver. Set the quality to "High."

The print head nozzles may be clogged. Perform a nozzle check to see if the print heads are clogged. If any nozzles are clogged, clean the print head.
Align the print head using the "Horizontal Alignment" function

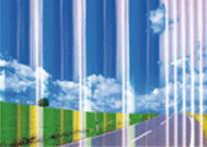
If vertical streaks appear, clean the paper path.
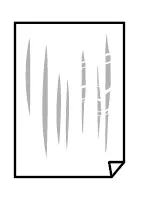
If cleaning the paper path doesn't resolve the problem, the area inside the printer shown in the image is dirty. Turn off the printer and wipe away the ink with a cotton swab.
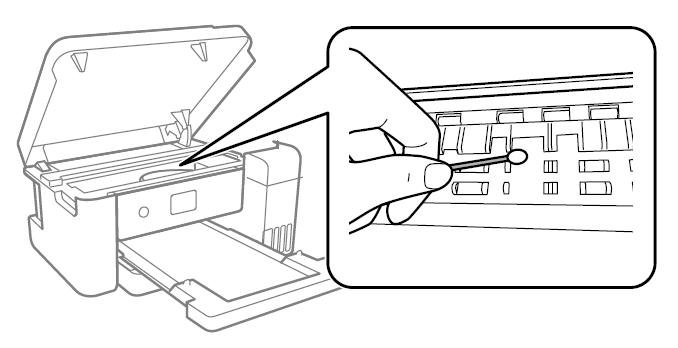
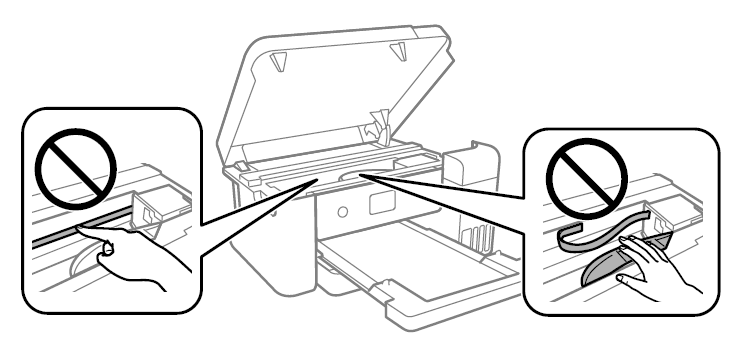
Do not touch the white flat cable, the transparent film, or the ink lines inside the printer. This may cause a malfunction!
Align the print head using the function: "Vertical alignment"
Bidirectional (or fast) printing means the print head prints in both directions. Vertical lines may not align properly. If print quality doesn't improve, disable bidirectional printing. Disabling it may cause printing to take longer.
This can occur especially with thicker materials when:
- If the material is cold, preheat it by placing it under the press for a while
- If many dark colours are used, increase the pressing time
- The larger objects require much more heat, so increase the pressing time as well
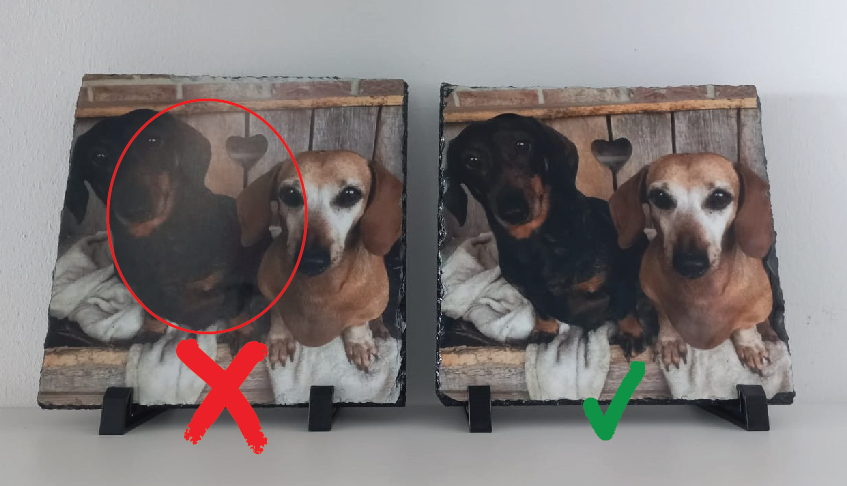
Below is an example of dark-colored slate. In the first case, 540 sec., in the second case, 720 sec.
Tip: Rotating the product 90° in half the time often also produces better results. Rotate the object along with the protective paper underneath!
If you haven't found a solution or answer to your question above, please use the form below. A service ticket will be automatically created. Check your inbox and, if necessary, your spam folder (trust the sender). You will receive a confirmation email. Further communication is often also sent by email!
SUPPORT TICKET